
Cloud Storage Config
Captain supports indexing from Amazon S3, Google Cloud Storage, Azure Blob Storage, Cloudflare R2, Supabase, Backblaze B2, and Dropbox.
This guide walks through the process of connecting them with Captain.
Choose your cloud storage provider






AWS S3 Bucket Setup
Step 1: Create the Bucket
-
Log in to the AWS Console
-
Navigate to S3 → Buckets → Create bucket
Captain recommends the following standard configuration:- Select a region for the bucket
- Set a bucket name
- Keep General Purpose Storage selected if asked
- Keep ACLs disabled
- Keep Block all public access checked
- (Optional) Enable Bucket Versioning (for SOC 2 compliance)
- Once these settings are configured, the bucket is ready.
Scroll down and click Create bucket
AWS S3 Access Keys
To index files from Amazon S3 buckets, you’ll need an AWS Access Key ID and Secret Access Key.
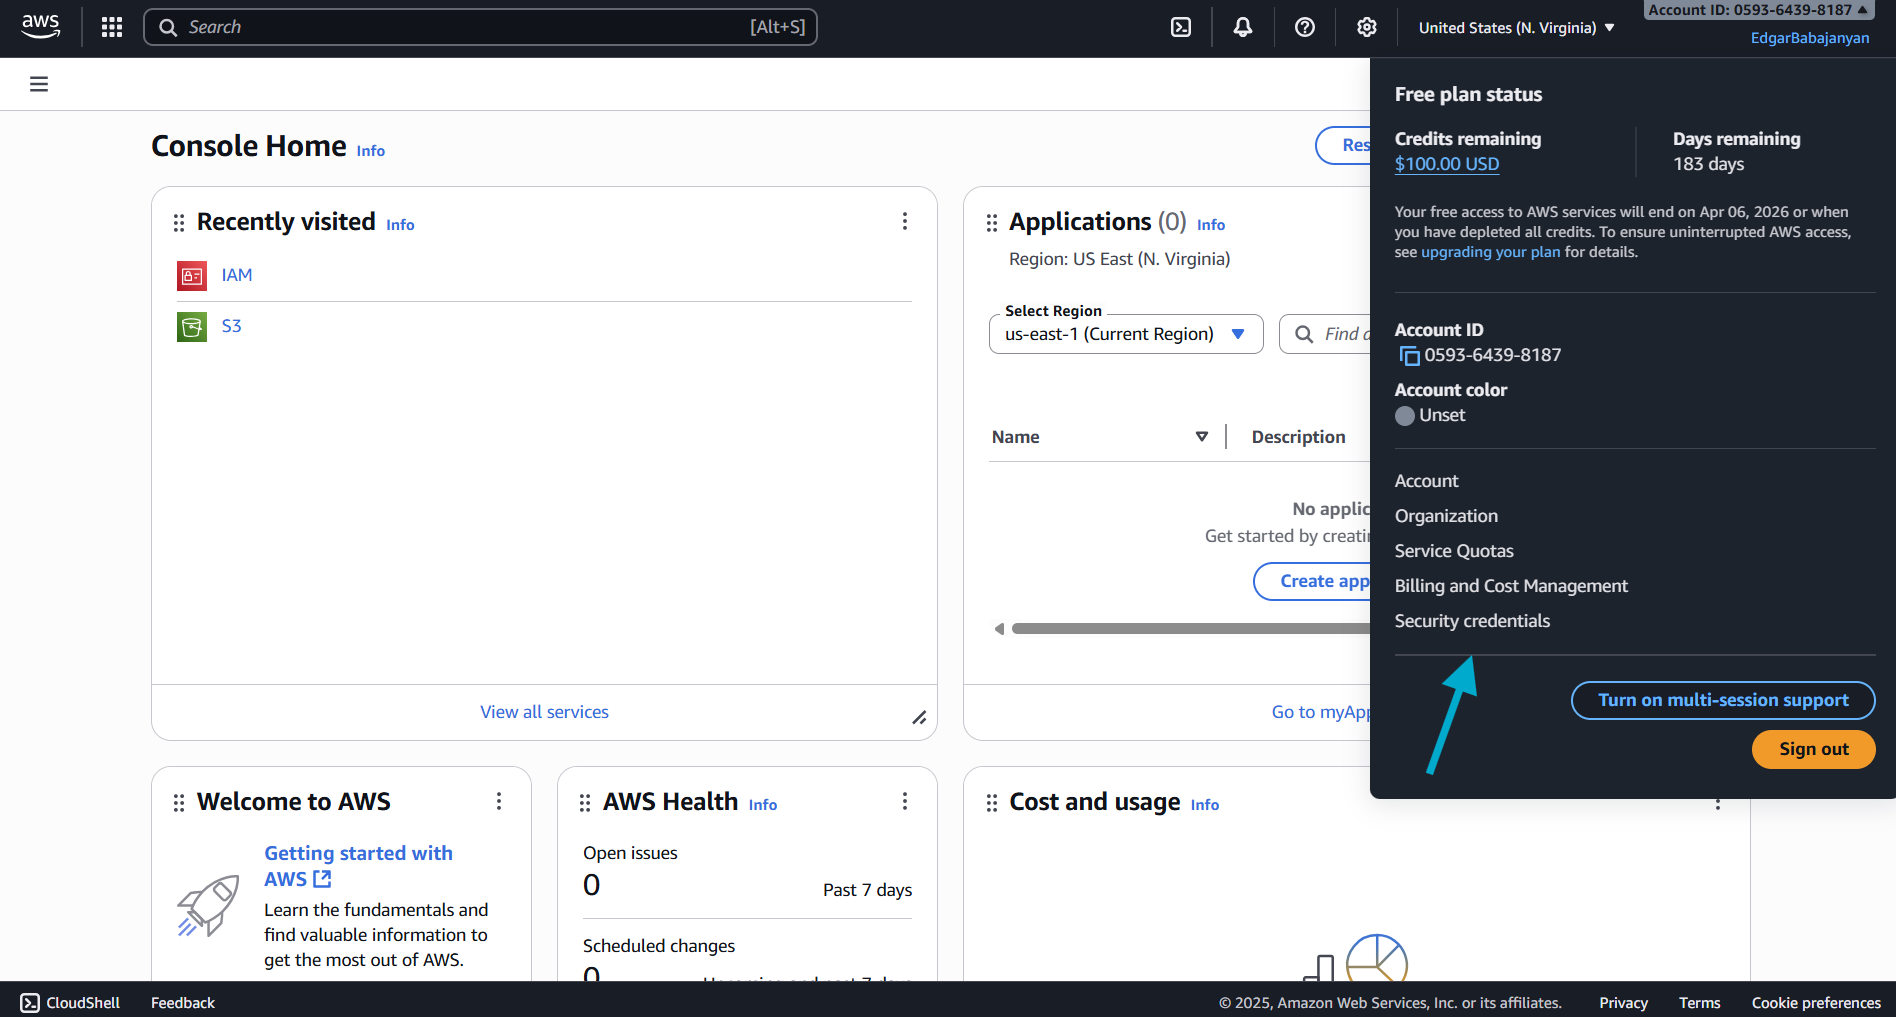
Step 1: Navigate to IAM Security Credentials
- Log in to the AWS Console
- Click on your account name in the top-right corner
- Select Security credentials from the dropdown menu
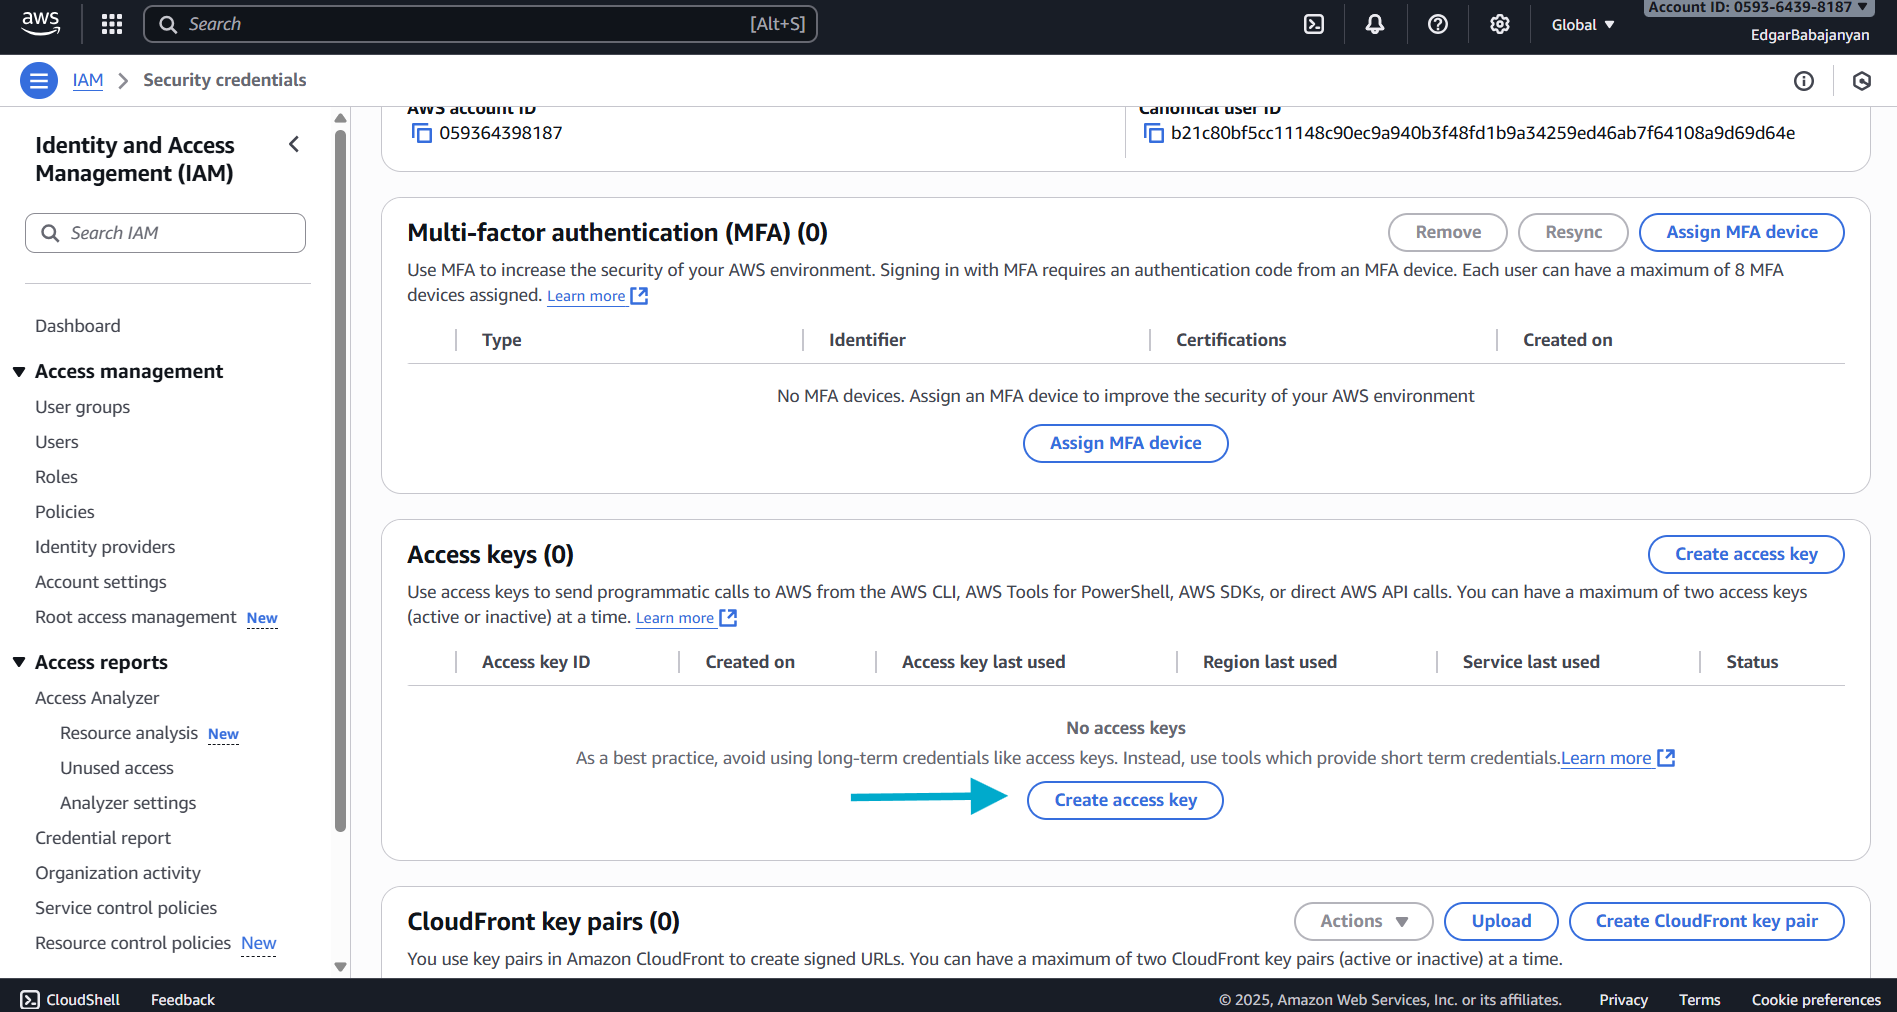
Step 2: Create Access Key
- Scroll down to the Access keys section
- Click the Create access key button
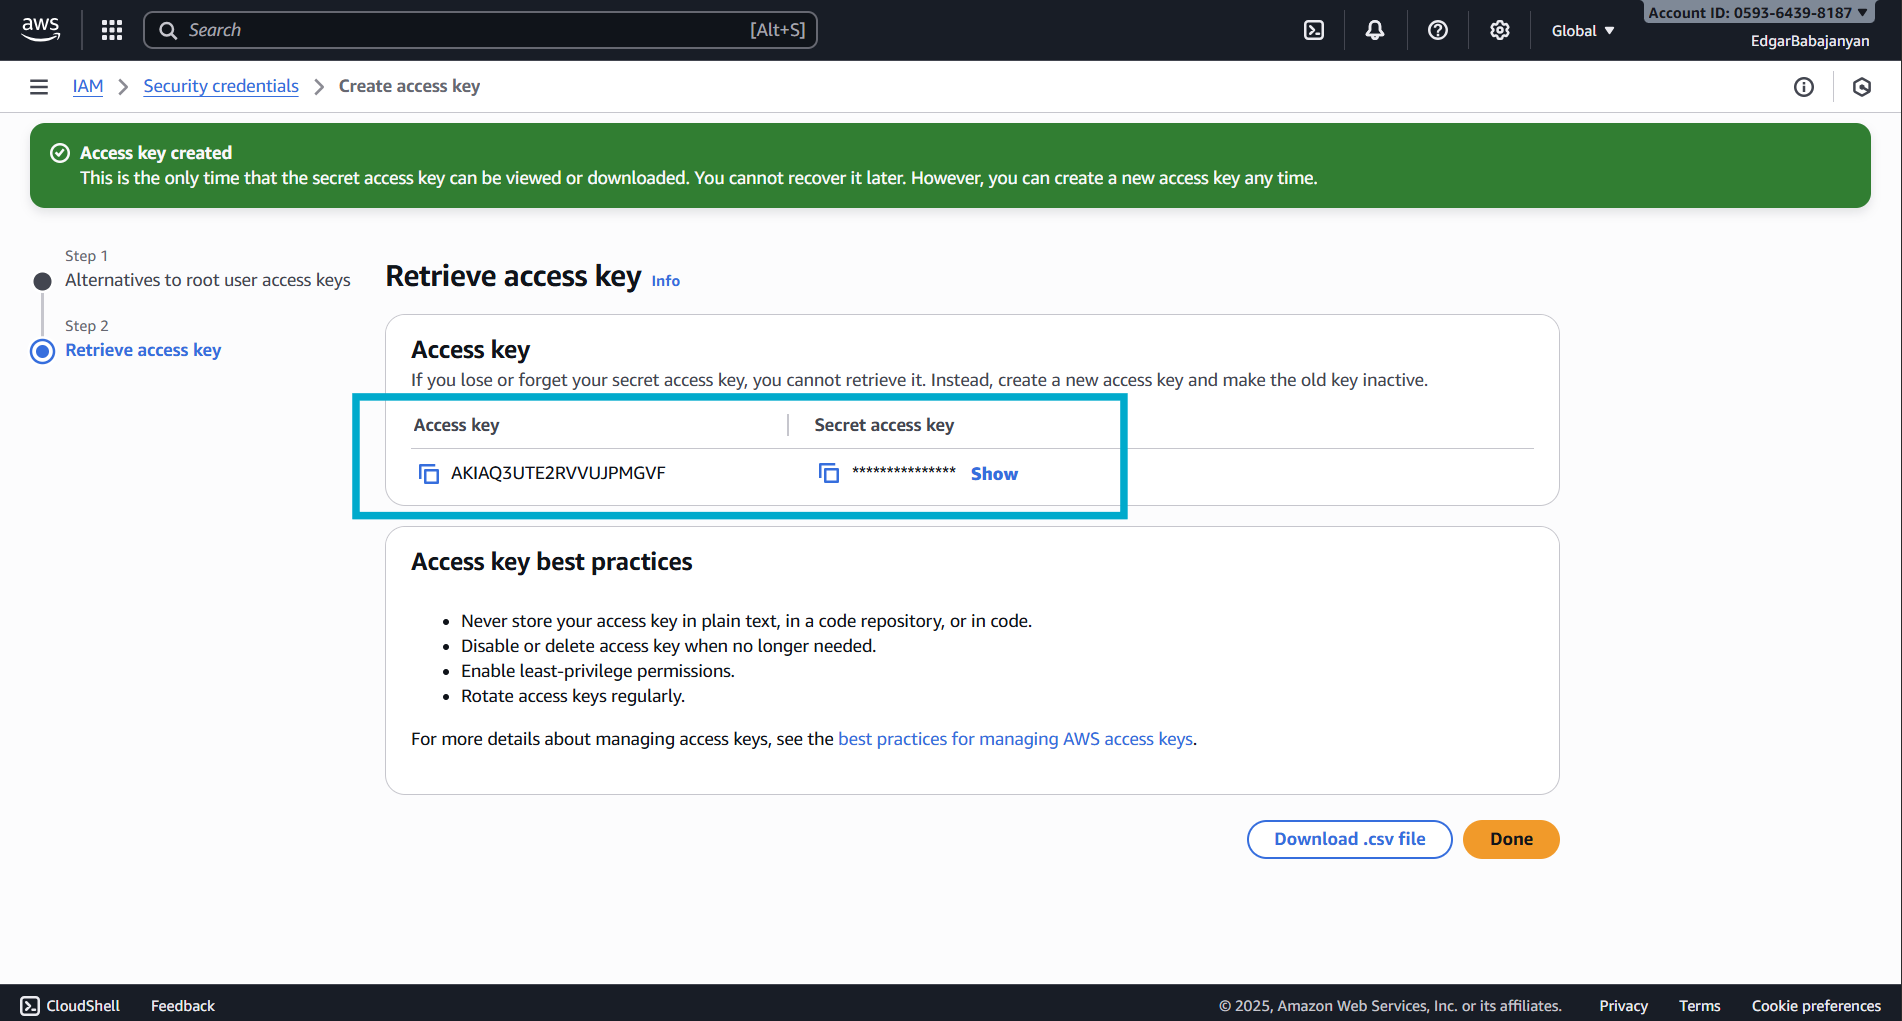
Step 3: Retrieve Your Credentials
- Your Access Key ID and Secret Access Key will be displayed
- Important: This is the only time you can view the Secret Access Key
- Click Show to reveal the Secret Access Key
- Copy both the Access Key ID and Secret Access Key to a secure location
- Optionally, download the
.csvfile for safekeeping
Required IAM Permissions (AWS)
Your AWS access key needs the following permissions to work with Captain:
For read-only access to S3 buckets:
Replace your-bucket-name with your actual S3 bucket name.
Google Cloud Storage Bucket Setup
Step 1: Create the Bucket
- Go to Google Cloud Console
- Navigate to Cloud Storage → Buckets → Create
- Enter a unique bucket name (e.g.,
company-captain-documents) - Select a Location type (Region, Dual-region, or Multi-region)
- Select Standard storage class for general use
- Under Access control, select “Uniform” (recommended)
- Click Create
Google Cloud Storage Credentials
To index files from Google Cloud Storage buckets, you’ll need a Service Account JSON key.
Step 1: Navigate to Service Accounts
- Go to Google Cloud Console
- Navigate to IAM & Admin → Service Accounts
- Click Create Service Account
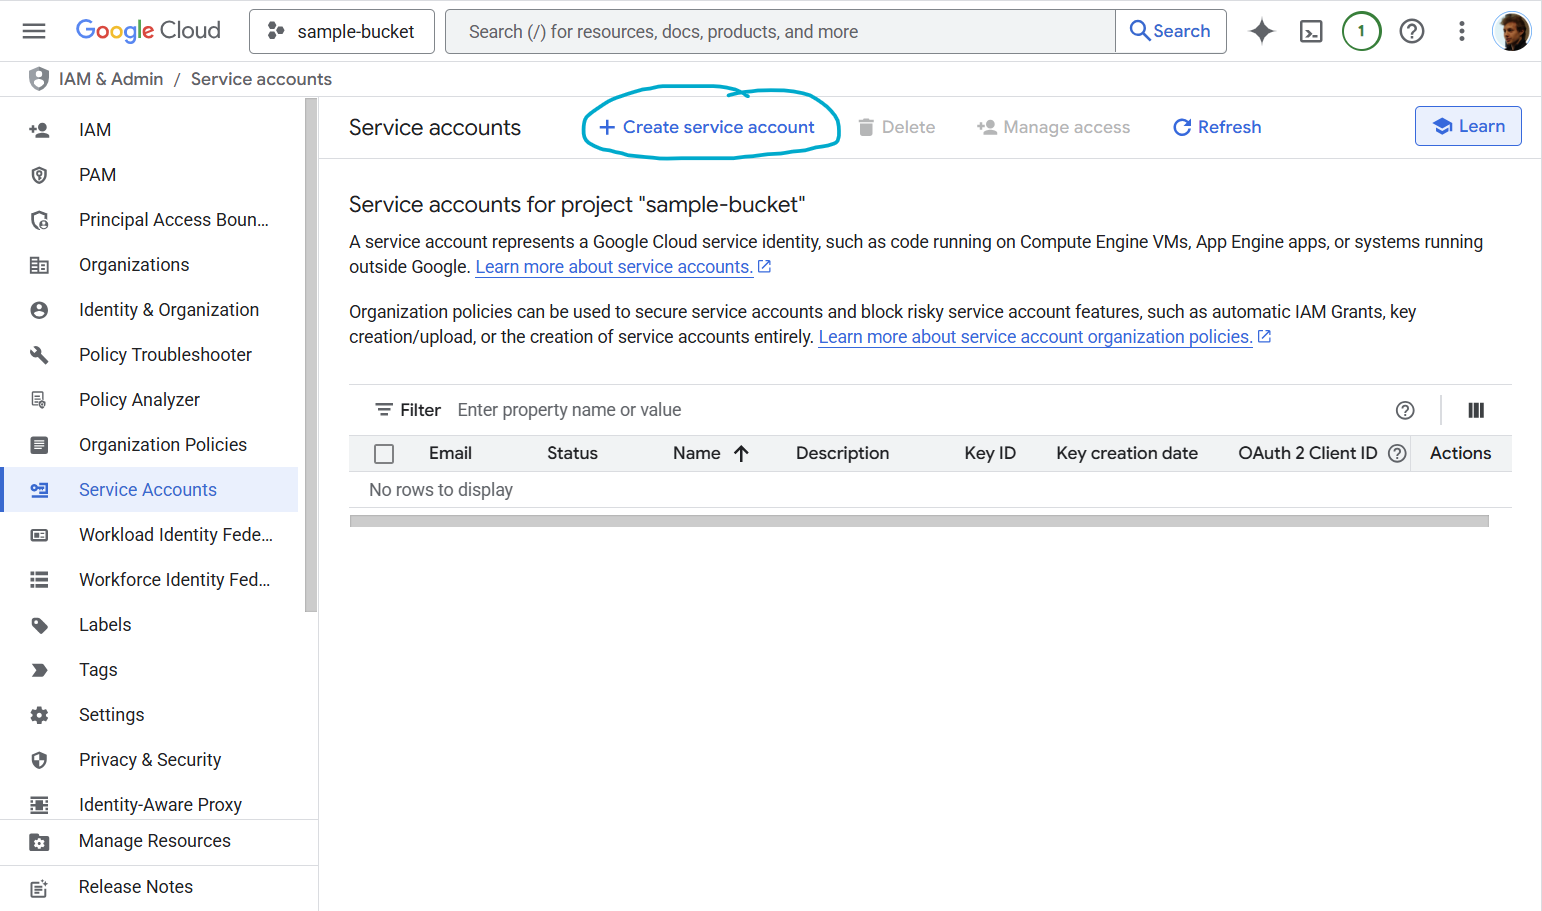
Step 2: Create Service Account
- Enter a Service account name (e.g.,
captain-storage-access) - Add a Service account description (optional but recommended)
- The Service account ID will be auto-generated
- Click Create and continue
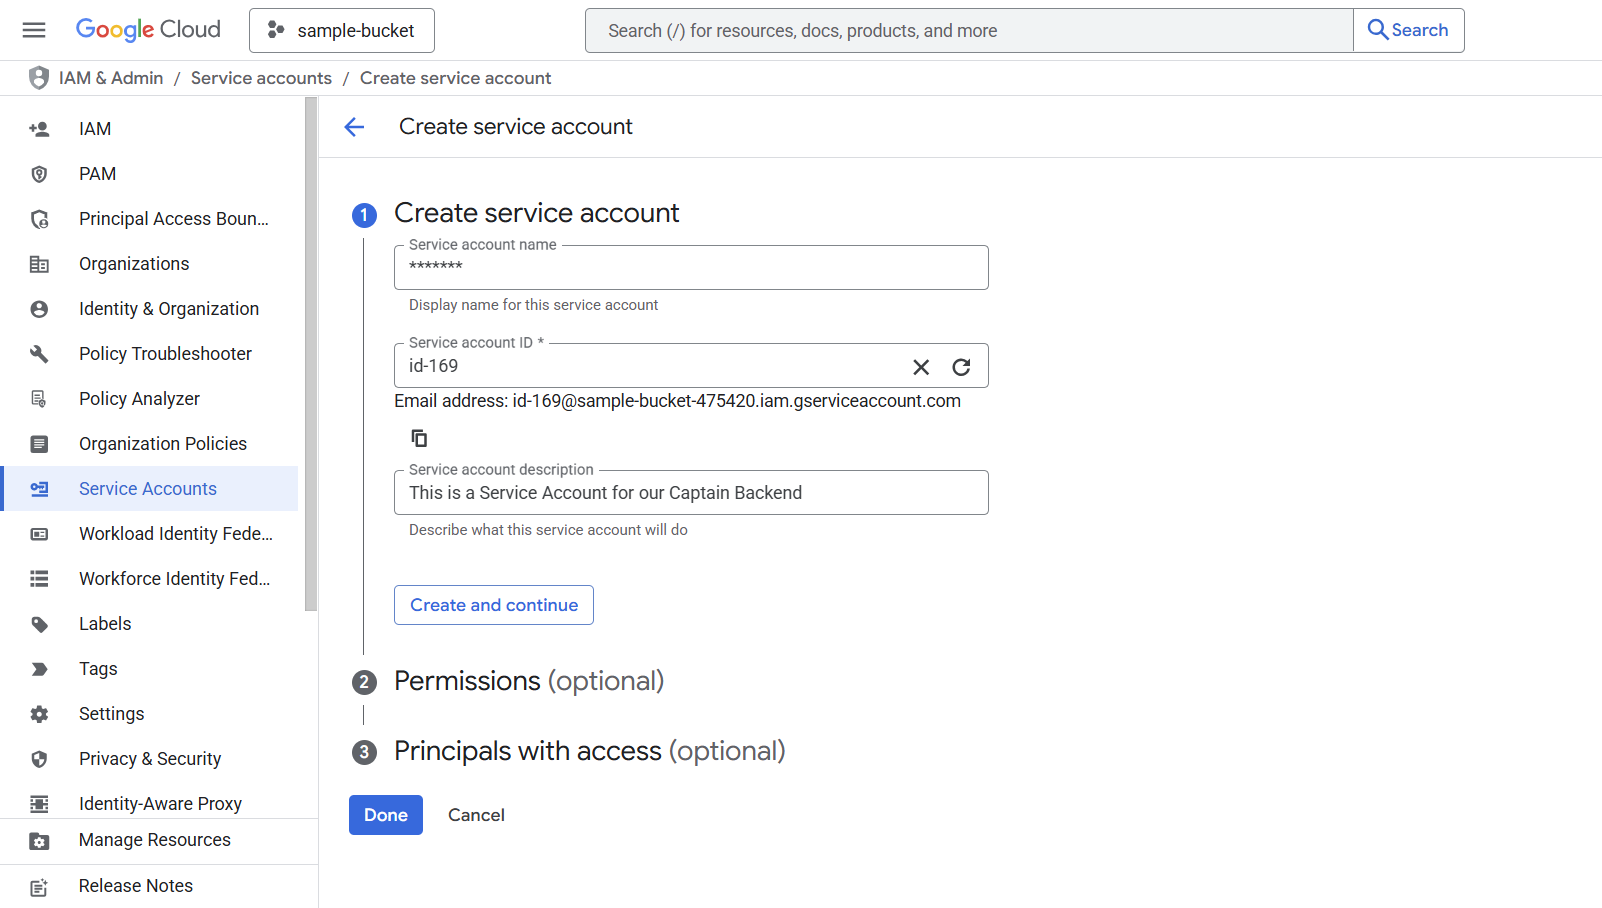
Step 3: Grant Permissions
Under Grant this service account access to project, choose the appropriate role based on your needs:
For read-only access to buckets/objects:
- Role: Storage Object Viewer (
roles/storage.objectViewer)
For read/write access:
- Role: Storage Object Admin (
roles/storage.objectAdmin)
For full bucket management:
- Role: Storage Admin (
roles/storage.admin)
Click Continue → Done
Step 4: Create and Download JSON Key
- You’ll now see your new service account in the list
- Click on the service account name
- Navigate to the Keys tab
- Click Add Key → Create New Key
- Select JSON as the key type
- Click Create
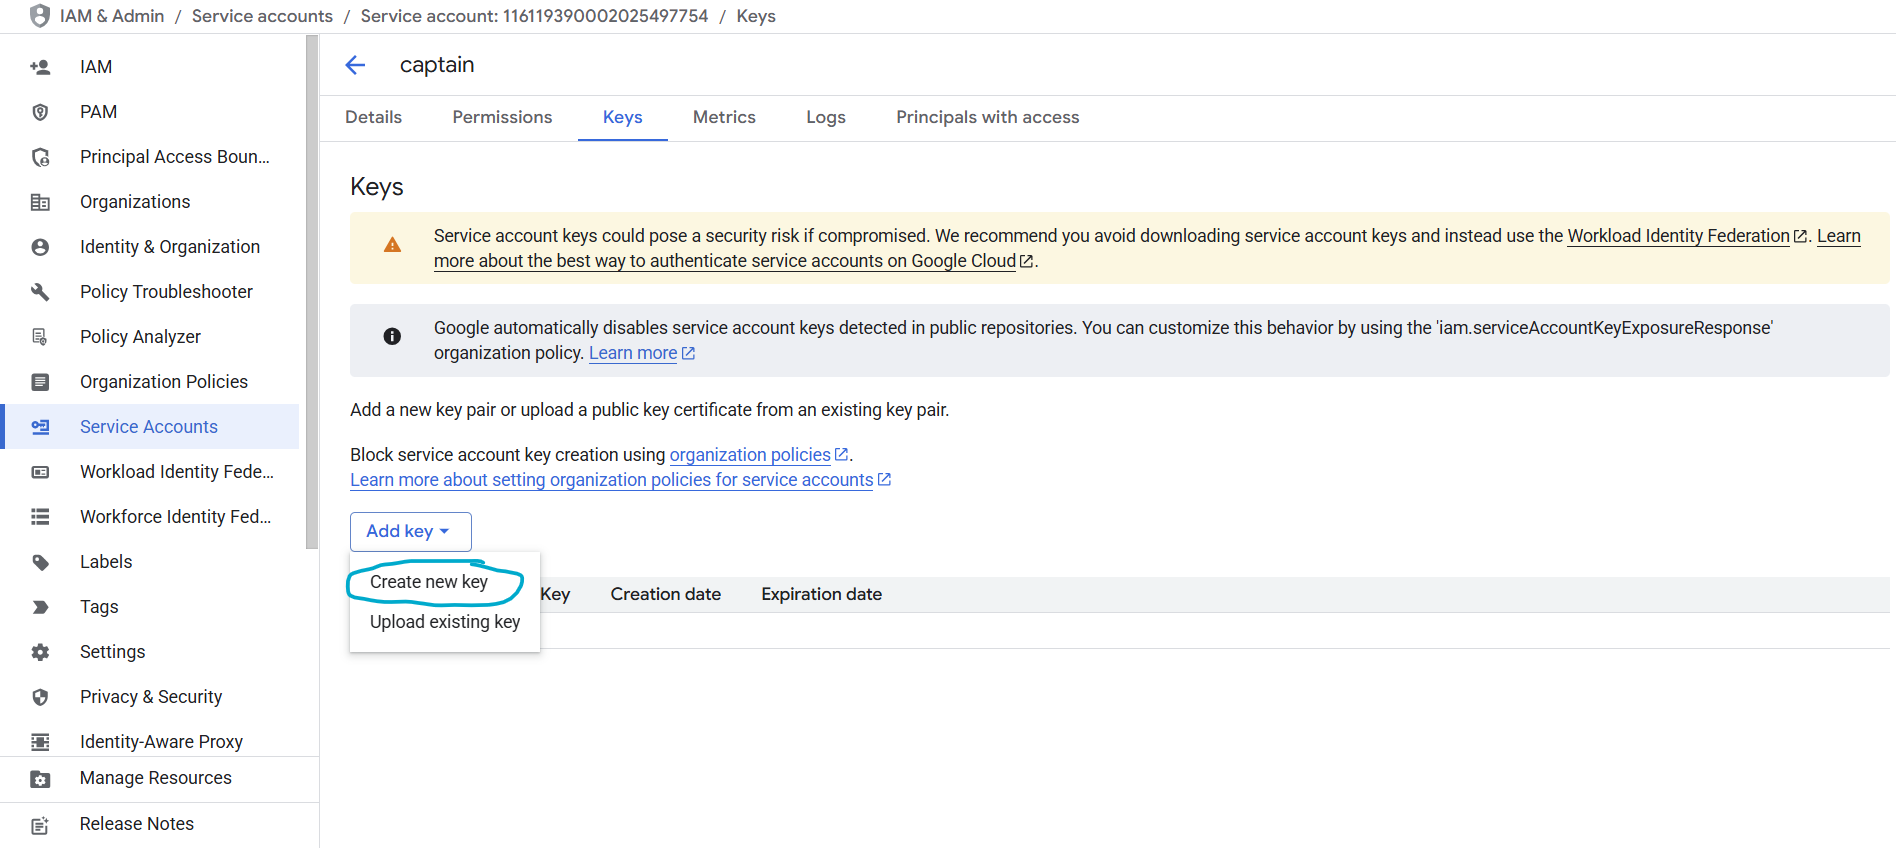
The JSON key file will automatically download to your computer. This file contains your service account credentials.
JSON Key File Format
Your downloaded JSON key will look like this:
Using Google Cloud Service Accounts with Captain
Store the JSON key file securely (e.g., in a secret management service or as an environment variable)
Azure Blob Storage Setup
Step 1: Create a Storage Account
- Log in to the Azure Portal
- Navigate to Storage accounts → Create
- Select your Subscription and Resource group (or create a new one)
- Enter a Storage account name (e.g.,
captaindocuments) - Select a Region closest to your operations
- Select Standard performance and LRS (Locally-redundant storage) for general use
- Click Review + create → Create
Step 2: Create a Container
- Open your new storage account
- Navigate to Data storage → Containers
- Click + Container
- Enter a container name (e.g.,
documents) - Set Private access level (no anonymous access)
- Click Create
Azure Blob Storage Credentials
To index files from Azure Blob Storage, you’ll need your Storage Account Name and Account Key.
Step 1: Get Your Account Name and Key
- Open your storage account in the Azure Portal
- Navigate to Security + networking → Access keys
- Your Storage account name is displayed at the top
- Click Show next to either key to reveal the Account Key (base64-encoded)
- Copy both values
Important: Treat the account key like a password. Store it securely (e.g., in a secret management service or as an environment variable).
Step 2: Use with Captain
Pass the account name, account key, and container name when calling the indexing endpoint:
curl
Python
TypeScript
Required Azure Permissions
The account key provides full access to all containers in the storage account. For more granular control, you can use Shared Access Signatures (SAS) with the following minimum permissions:
- Read. to access blob contents
- List. to enumerate blobs in the container
You can generate a SAS token from the Azure Portal under your storage account’s Shared access signature settings.
Cloudflare R2 Setup
Step 1: Create an R2 Bucket
- Log in to the Cloudflare Dashboard
- Navigate to R2 Object Storage → Create bucket
- Enter a bucket name (e.g.,
captain-documents) - Select a location hint (optional. R2 automatically distributes globally)
- Click Create bucket
Cloudflare R2 Credentials
To index files from Cloudflare R2, you’ll need your Account ID, an Access Key ID, and a Secret Access Key.
Step 1: Find Your Account ID
- Log in to the Cloudflare Dashboard
- Your Account ID is visible in the URL:
https://dash.cloudflare.com/<account_id> - You can also find it on the R2 Overview page in the right sidebar
Step 2: Create an R2 API Token
- Navigate to R2 Object Storage → Manage R2 API Tokens
- Click Create API token
- Enter a token name (e.g.,
captain-read-access) - Under Permissions, select Object Read only
- Under Specify bucket(s), select your bucket or allow access to all buckets
- Click Create API Token
Step 3: Retrieve Your Credentials
- Your Access Key ID and Secret Access Key will be displayed
- Important: This is the only time you can view the Secret Access Key
- Copy both values to a secure location
Step 4: Use with Captain
Pass the account ID, access key ID, secret access key, and bucket name when calling the indexing endpoint:
curl
Python
TypeScript
R2 Jurisdictions
R2 supports jurisdiction-restricted storage. You can optionally specify a jurisdiction parameter:
default. Global (no restriction). This is the default.eu. EU-only data residencyfedramp. FedRAMP-compliant storage
Required R2 Permissions
Your R2 API token needs the following minimum permissions:
- Object Read. to access object contents
- List. to enumerate objects in the bucket
For more granular control, create a token scoped to a specific bucket rather than all buckets.
Supabase Setup
Supabase Storage is S3-compatible, so Captain connects to it through its S3 endpoint.
Step 1: Create a Storage Bucket
- Log in to the Supabase Dashboard and open your project
- Navigate to Storage → New bucket
- Enter a bucket name (e.g.,
documents) - Choose whether the bucket is public or private (private is fine. Captain authenticates with S3 credentials)
- Click Create bucket
Supabase Credentials
To index files from Supabase, you’ll need the S3 endpoint URL, the region, an Access Key ID, and a Secret Access Key.
Step 1: Enable the S3 Connection
- In the Supabase Dashboard, navigate to Storage → S3 Connection
- Enable the S3 connection if it isn’t already enabled
- Copy the Endpoint (e.g.,
https://abcdefgh.storage.supabase.co/storage/v1/s3) and the Region shown on this page
Pass this endpoint as endpoint_url. The subdomain is your project ref. for https://abcdefgh.storage.supabase.co/storage/v1/s3 the project ref is abcdefgh, but Captain only needs the full endpoint_url copied from Storage → S3 Connection.
Step 2: Create S3 Access Keys
- On the S3 Connection page, click Create new access key (under S3 Access Keys)
- Enter a description (e.g.,
captain-read-access) - Click Create access key
Step 3: Retrieve Your Credentials
- Your Access Key ID and Secret Access Key will be displayed
- Important: This is the only time you can view the Secret Access Key
- Copy both values to a secure location
Step 4: Use with Captain
Pass the endpoint URL, bucket name, access key ID, and secret access key when calling the indexing endpoint. region is optional and defaults to us-east-1:
curl
Python
TypeScript
Endpoint URL
Captain connects using the endpoint_url you pass:
endpoint_url. The full S3-compatible endpoint URL, copied from Storage → S3 Connection. It has the formhttps://<project_ref>.storage.supabase.co/storage/v1/s3, where<project_ref>is your project’s subdomain (e.g.abcdefgh).
Required Supabase Permissions
The S3 access key needs read and list access to the bucket you want to index. Access keys created from Storage → S3 Connection carry the necessary permissions by default.
Backblaze B2 Setup
Backblaze B2 is S3-compatible, so Captain connects to it through its S3 endpoint.
Step 1: Create a Bucket
- Log in to the Backblaze B2 dashboard and open Buckets
- Click Create a Bucket
- Enter a bucket name (e.g.,
documents) - Choose whether the bucket is public or private (private is fine. Captain authenticates with S3 credentials)
- Click Create a Bucket
- Open the bucket’s details page. it shows the bucket’s Endpoint (in the form
https://s3.<region>.backblazeb2.com, e.g.https://s3.us-west-004.backblazeb2.com) and its Region
Backblaze B2 Credentials
To index files from Backblaze B2, you’ll need the S3 endpoint URL, the region, an Access Key ID (Application Key ID), and a Secret Access Key (Application Key).
Step 1: Find the Endpoint and Region
- In the Backblaze B2 dashboard, open Buckets and select your bucket
- On the bucket’s details page, copy the Endpoint (e.g.,
https://s3.us-west-004.backblazeb2.com) and the Region (e.g.,us-west-004) shown there
Pass this endpoint as endpoint_url. The region in the endpoint (e.g. us-west-004) must match the region you send.
Step 2: Create an Application Key
- Navigate to App Keys in the Backblaze B2 dashboard
- Click Add a New Application Key (do not use the master application key. it cannot be used with the S3-compatible API)
- Give the key a name and, optionally, scope it to a specific bucket with read access
- Click Create New Key
Step 3: Retrieve Your Credentials
- Backblaze displays a keyID and an applicationKey
- Important: the
applicationKeyis shown only once, at creation time - Copy both values to a secure location. use the keyID as
access_key_idand the applicationKey assecret_access_key
Step 4: Use with Captain
Pass the endpoint URL, bucket name, access key ID (Application Key ID), secret access key (Application Key), and region when calling the indexing endpoint. Backblaze B2’s S3 API requires v4 signatures over HTTPS, which Captain uses by default:
curl
Python
TypeScript
Endpoint URL
Captain connects using the endpoint_url you pass:
endpoint_url. The full S3-compatible endpoint URL, copied from the bucket’s details page. It has the formhttps://s3.<region>.backblazeb2.com, where<region>is your bucket’s region (e.g.us-west-004).
Required Backblaze B2 Permissions
The Application Key needs read (and list) access to the bucket you want to index. Create the key on the App Keys page. the master application key cannot be used with the S3-compatible API.
Dropbox Setup
Step 1: Create a Dropbox App
- Log in to the Dropbox App Console
- Click Create app
- Under Choose an API, select Scoped access
- Under Choose the type of access you need, select Full Dropbox (or App folder to scope to a single folder)
- Enter an app name (e.g.,
captain-indexing) - Click Create app
Dropbox Credentials
To index files from Dropbox, you’ll need a Dropbox access token.
Step 1: Grant the Required Scopes
- Open your app in the Dropbox App Console
- Navigate to the Permissions tab
- Enable the following scopes:
files.metadata.read. to list files and read their metadatafiles.content.read. to download file contents for indexingsharing.write(optional). lets Captain store a permanent Dropbox link as each document’ssource.uri, so results link straight back to the original file. Without it, indexing still works and thesource.urifalls back to the file’s Dropbox path.
- Click Submit to save the permission changes
Step 2: Generate an Access Token
- Navigate to the Settings tab
- Under OAuth 2, find Generated access token
- Click Generate
- Copy the token to a secure location
Tokens generated from the App Console are scoped to your own Dropbox account and are short-lived. This is ideal for one-shot indexing jobs, which complete in minutes. Regenerate a token whenever you start a new job.
Step 3: Use with Captain
Pass the access token when calling the indexing endpoint. The /index/dropbox endpoint indexes the entire account recursively. To scope a job to a single folder or file, use /index/dropbox/directory (with directory_path) or /index/dropbox/file (with file_path) instead:
curl
Python
TypeScript
Required Dropbox Scopes
Your Dropbox access token needs the following minimum scopes:
files.metadata.read. to list files and read their metadatafiles.content.read. to download object contents for indexing
Optionally, add sharing.write so Captain can store a permanent, clickable Dropbox link as each indexed document’s source.uri. Without it, indexing works normally and source.uri falls back to the file’s Dropbox path.
Enable these on the Permissions tab of the App Console, then regenerate the access token so the new scopes take effect.
Google Drive (headless) Setup
Unlike the other providers, Google Drive uses service-account domain-wide delegation — no per-user OAuth pop-up. Your Google Workspace admin authorizes one service account once, and Captain reads Drive as a specific user you name on each request: a single file, a folder (recursively), or that user’s entire Drive. Use this to index Drive content at scale, on a schedule, or on behalf of many users, with no login step in the loop.
The setup below is done once by someone with Google Workspace super administrator rights on your domain (about 15 minutes). After that, indexing is a plain API call.
Step 1: Create a service account and key
You need a Google Cloud project to hold the service account. If your organization doesn’t use Google Cloud, that’s fine — any Google account can create a project for free, and this use case requires no billing.
- Go to console.cloud.google.com.
- Create a project (or pick an existing one): open the project picker in the
top bar, click New Project, name it (for example
captain-drive-indexing), and click Create. - Enable the Drive API: go to APIs & Services → Enable APIs and services, search for “Google Drive API”, and click Enable.
- Create the service account: go to IAM & Admin → Service Accounts, click
Create service account, give it a name (for example
captain-indexing), and click Create and continue. Skip the optional roles and click Done. No project roles are needed; this account’s access comes entirely from the Workspace delegation grant in Step 2. - Create a key: open the service account, go to the Keys tab, and click
Add key → Create new key → JSON → Create. A
.jsonfile downloads. This is theservice_account_jsonyou’ll send to Captain — keep it secret. - Note the service account’s numeric Client ID (also called the “Unique ID” or “OAuth2 Client ID”) from the Details tab. You’ll need it in Step 2.
Google does not offer a way to create a service account entirely inside the Admin console — the account itself must be created in Google Cloud, as above. Only the delegation grant (Step 2) lives in the Admin console.
Step 2: Authorize the service account (domain-wide delegation)
This is the grant that lets Captain read Drive as your users. It’s done in the
Admin console (admin.google.com), a different console from Step 1.
- Go to admin.google.com, then Security → Access and data control → API controls.
- In the Domain-wide delegation panel, click Manage Domain-Wide Delegation.
- Click Add new and enter:
- Client ID: the numeric Client ID from Step 1 (not the service account’s email address).
- OAuth scopes: exactly
https://www.googleapis.com/auth/drive.readonly
- Click Authorize.
Grant only drive.readonly — Captain never writes to or deletes from Drive.
The grant can take a few minutes to propagate (occasionally up to ~30); if
your first call returns unauthorized_client, wait and retry.
Google Drive Credentials
Every request sends the service-account key plus a subject_email — the
Workspace user whose Drive Captain reads. Only what that user can see is
indexed.
Choosing subject_email:
- A specific person’s Drive — their email (e.g.
analyst@yourco.com). - A Shared Drive / team content — any user who is a member of that Shared Drive. Files that user can’t see are skipped.
- An org-wide identity — many teams create a dedicated Workspace user
(e.g.
indexing@yourco.com), share the relevant Drives with it, and always impersonate that account, keeping the indexed scope explicit and auditable.
Index a single file, a folder (recursively), or the user’s entire Drive:
Swap the endpoint and id field for other scopes:
- Single file —
.../index/gdrive/filewith"file_id": "1AbC..."(the/d/<id>/part of a file URL). - Entire Drive —
.../index/gdrivewith no id field.
folder_id is the trailing segment of a folder URL
(drive.google.com/drive/folders/<folder_id>).
What gets indexed: regular files (PDF, DOCX, XLSX, images, etc.) normally;
native Google Docs and Slides export to PDF and Sheets export to XLSX
automatically; Shared Drives are included. Google Forms/Sites are skipped, as
is any file the subject_email user can’t access (logged and skipped — the
job continues).
Troubleshooting
AWS Issues
Error: “Invalid AWS credentials”
- Verify your Access Key ID and Secret Access Key are correct
- Check that the access key is active in the IAM console
- Ensure your IAM user/role has the necessary S3 permissions
Error: “Access Denied”
- Verify your IAM permissions include
s3:GetObjectands3:ListBucket - Check bucket policies and ensure they allow your IAM user/role
- Verify the bucket region matches the
bucket_regionparameter
Google Cloud Issues
Error: “Invalid service account credentials”
- Verify the JSON key file is valid and not corrupted
- Check that the service account is enabled
- Ensure the service account has the necessary Storage permissions
Error: “Permission denied”
- Verify the service account has the appropriate Storage role
- Check that the bucket exists and the service account has access
- Review IAM permissions in the Google Cloud Console
Azure Issues
Error: “Invalid credentials”
- Verify the account name matches your storage account exactly
- Check that the account key is the full base64-encoded key (not truncated)
- Ensure the storage account exists and is active
Error: “Container not found”
- Verify the container name matches exactly (case-sensitive)
- Check that the container exists in the storage account
- Ensure the storage account is in the correct subscription
Cloudflare R2 Issues
Error: “Invalid credentials”
- Verify your Account ID matches the one in your Cloudflare dashboard URL
- Check that the Access Key ID and Secret Access Key are from an R2 API token (not a general Cloudflare API token)
- Ensure the API token has not been revoked
Error: “Access Denied”
- Verify the R2 API token has Object Read permissions
- Check that the token is scoped to the correct bucket (or all buckets)
- Ensure the bucket exists and is in the correct jurisdiction
Supabase Issues
Error: “Invalid credentials”
- Verify your
endpoint_urlpoints athttps://<project_ref>.storage.supabase.co/storage/v1/s3(copied from Storage → S3 Connection) - Check that the Access Key ID and Secret Access Key are S3 access keys from Storage → S3 Connection (not the project’s anon/service_role API keys)
- Ensure the S3 connection is enabled for your project
Error: “Access Denied”
- Confirm the S3 access key has read and list access to the target bucket
- Check that the
regionmatches the one shown on the S3 Connection page (defaults tous-east-1) - Ensure the bucket exists and the name is spelled correctly
Backblaze B2 Issues
Error: “Invalid credentials”
- Verify you are using an Application Key (created on the App Keys page), not the master application key. the master key cannot be used with the S3-compatible API
- Check that the keyID is passed as
access_key_idand the applicationKey assecret_access_key - Ensure the Application Key has not been deleted
Error: “Access Denied”
- Confirm the Application Key has read (and list) access to the target bucket
- Check that the
endpoint_urlandregionmatch the values shown on the bucket’s details page (the region inhttps://s3.<region>.backblazeb2.commust matchregion) - Ensure the bucket exists and the name is spelled correctly
Dropbox Issues
Error: “Invalid credentials”
- Verify the access token is correct and copied in full (not truncated)
- Tokens generated from the App Console are short-lived. Regenerate a fresh token if the job was created a while after the token was minted
- Ensure the token belongs to the Dropbox account that holds the files you want to index
Error: “Access Denied”
- Verify the app has the
files.metadata.readandfiles.content.readscopes enabled on the Permissions tab - Regenerate the access token after changing scopes. tokens minted before a scope change do not carry the new permissions
- Check that the
pathexists and is spelled correctly (Dropbox paths are case-insensitive but must otherwise match)
Need Help?
If you encounter issues obtaining or using your cloud storage credentials, contact Captain support:
- Email: support@runcaptain.com